Windows 11 has always existed to be a stage for the world’s innovation. It’s been the backbone of global businesses and where scrappy startups became household names. The web was born and grew up on Windows. It’s where many of us wrote our first email, played our first PC game, and wrote our first line of code. Windows is the place people go to create, to connect, to learn, and achieve – a platform over a billion people today rely on.
The responsibility of designing for that many people is one we don’t take lightly. The past 18 months brought an incredible shift in how we used our PCs; we went from fitting the PC into our lives to trying to fit our whole lives into the PC. Our devices weren’t just where we went for meetings, classes, and to get things done, but where we came to play games with friends, binge-watch our favorite shows, and, perhaps most meaningfully, connect. In the process, we found ourselves recreating the office banter, the hallway chatter, workouts, happy hours, and holiday celebrations – digitally.
What was so powerful was the shift in the PC we saw and felt – from something practical and functional to something personal and emotional. This inspired us as we were building the next generation of Windows. To build you a place that feels familiar, where you can create, learn, play, and most importantly, connect in all new ways.
Today, I am humbled and excited to introduce you to Windows 11, the Windows that brings you closer to what you love.
In this article, I am with you to learn how to install Windows 11 on VMware Workstation. Just download and install the latest VMware Workstation software before starting this tutorial and have the Windows 11 ISO ready. Let’s get started…
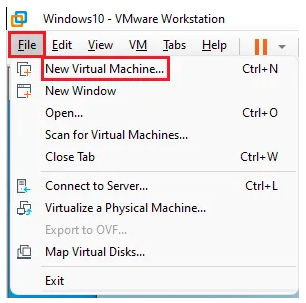
First, we have to create our virtual machine. For this purpose, we operate in VMware Workstation software, as shown below.

Select the Custom option and click Next.
Follow the steps below and click Next.
In this section, click on Browse and select the Windows 11 ISO file.
Be careful in the operating system selection section and be sure to select Windows 10 64-bit.
Enter the name of your virtual machine and specify the storage location for its files.
In the Firmware Type section, select the default settings and click Next.
In the CPU selection section for the virtual machine, you can choose one 2-core processor, as shown in the image below.
Specify the required amount of RAM in this section.
Set the network card settings to your desired state. NAT allows the Internet to be transferred to a virtual machine.
Continue the rest of the parts as default until you reach the virtual disk creation part. Click on Create a new virtual disk and then click on Next.
Select the Store virtual disk as a single file option and specify the size of your hard disk in the Maximum disk Size section.
Continue the parts until you reach the final page and click Finish to build your car.
After creating the virtual machine, click on the Power On button to turn on your virtual machine.
Press a key…
And as you can see, you enter the installation steps related to Windows 11. Continue these steps, like installing Windows 10, until your Windows 11 is installed on the VMware Workstation virtual machine.